ENGR 201 Fall 2026 - Lecture 23 - Shear & Moment Equations (Diagrams - Equation Method - functions)
Overview
Bruno Guidio develops the equation method for shear and moment diagrams: find support reactions, identify load discontinuities, write piecewise functions of position x, and plot each interval. A 5 kN point-load example produces constant shear and linear moment, while a 14 ft beam with 250 lb end loads, 700 lb reactions, and a 150 lb/ft distributed load illustrates piecewise shear, a parabolic moment curve, and the moment extremum where shear crosses zero.
Key takeaways
- For each interval between load discontinuities, cut at an arbitrary coordinate x and use equilibrium to derive separate shear and moment functions.
- A point force creates a jump in the shear diagram equal to the force magnitude, while the moment diagram remains continuous unless a concentrated couple is applied.
- A distributed load with intensity w over a partial length L can be replaced on a section free body by a resultant wL acting at the segment's centroid; for a uniform load, that is L/2 from either end.
- The 14 ft example has V(x) = -150x + 1,050 lb and M(x) = -75x² + 1,050x - 4,000 lb·ft on 4 ≤ x ≤ 10 ft.
- Where shear crosses zero, the bending moment has a local extremum; in the loaded-span example, V = 0 at x = 7 ft and M = -325 lb·ft.
- A right-side section cut can simplify the final interval while preserving a global coordinate x; for the 14 ft beam, the cut-to-end distance is 14 - x.
Chapters
- Bruno Guidio introduces shear and moment equations as the focus of ENGR 201 Lecture 23.
- He notes that the returned exam can be discussed after the class.
- The prior lecture introduced internal normal force, shear force, and bending moment using the method of sections.
- Normal force acts parallel to a member, shear acts perpendicular to it, and internal moment resists rotation.
- For distributed loading, an equivalent resultant helps calculate reactions, while a section cut is used to find internal forces.
- The goal shifts from finding internal forces at one location to finding shear and moment at every point along a beam.
- Diagrams provide a whole-member view that helps identify values such as maximum shear and moment.
- The equation method uses position x to derive functions, then plots those functions over their applicable intervals.
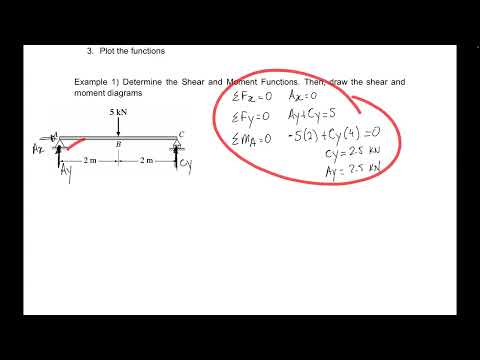
- For the 4 m simply supported example, a 5 kN point load at the midpoint gives reactions of 2.5 kN at A and C.
- The load and support locations A, B, and C are important points because they mark changes in loading.
- Those three points divide the beam into two sections, A to B and B to C, each requiring its own equations.
- A cut at arbitrary distance x from A, with 0 ≤ x ≤ 2 m, includes the 2.5 kN reaction but not the midpoint load.
- Vertical equilibrium gives V(x) = 2.5 kN throughout the first interval.
- Moment equilibrium about the cut gives M(x) = 2.5x kN·m, increasing from 0 at A to 5 kN·m at B.
- For 2 ≤ x ≤ 4 m, the left-side free body includes the 2.5 kN reaction and the 5 kN point load at B.
- Vertical equilibrium gives V(x) = -2.5 kN, a constant value after the point load.
- Moment equilibrium gives M(x) = -2.5x + 10 kN·m, matching 5 kN·m at x = 2 m and reaching zero at C.
- The shear diagram is +2.5 kN from A to B, then jumps by 5 kN to -2.5 kN at the point load and stays constant to C.
- The moment diagram is linear on both intervals and reaches its maximum value of 5 kN·m at B.
- A concentrated force causes a jump in shear, while the moment remains continuous because no concentrated couple is applied.
- Normal-force diagrams also exist, but the worked examples emphasize shear and bending moment.
- The next example uses a 14 ft beam with end loads of 250 lb, 700 lb support reactions at x = 4 ft and x = 10 ft, and a distributed load between the supports.
- The distributed load begins at x = 4 ft and ends at x = 10 ft; its intensity is 150 lb/ft.
- The beam endpoints and the two support/load-transition locations divide the beam into intervals 0 to 4 ft, 4 to 10 ft, and 10 to 14 ft.
- A cut at 0 ≤ x ≤ 4 ft includes the 250 lb end load and no support reaction or distributed load.
- Vertical equilibrium gives V(x) = -250 lb on this first interval.
- Moment equilibrium gives M(x) = -250x lb·ft, reaching -1,000 lb·ft at x = 4 ft.
- For 4 ≤ x ≤ 10 ft, the left-side free body includes the 250 lb end load, 700 lb reaction, and only the distributed load between 4 ft and x.
- The partial distributed load has resultant 150(x - 4) lb, acting halfway across its length, at a distance (x - 4)/2 from the start of the loaded segment.
- Vertical equilibrium simplifies to V(x) = -150x + 1,050 lb, which changes linearly across the loaded interval.
- Moment equilibrium about a cut in the 4 to 10 ft interval includes the 250 lb load at distance x, the 700 lb reaction at distance x - 4, and the partial distributed-load resultant.
- Expanding and combining terms gives M(x) = -75x² + 1,050x - 4,000 lb·ft.
- The negative coefficient of x² makes the moment curve concave down, so plotting the interval requires more than joining its endpoints with a straight line.
- A right-side free body avoids carrying the full distributed load and multiple left-side forces into the final interval calculation.
- For a beam length of 14 ft, the distance from the right end to a cut at global coordinate x is 14 - x.
- Equilibrium gives V(x) = 250 lb and M(x) = 250x - 3,500 lb·ft for 10 ≤ x ≤ 14 ft.
- The right-side expressions agree with the equations obtained from a left-side cut.
- The piecewise shear functions are -250 lb for 0 to 4 ft, -150x + 1,050 lb for 4 to 10 ft, and +250 lb for 10 to 14 ft.
- At x = 4 ft, shear jumps from -250 lb to +450 lb because of the 700 lb support reaction; at x = 10 ft, it jumps from -450 lb to +250 lb.
- The linear middle segment crosses zero at x = 7 ft, consistent with the shear value calculated at that location in the earlier section-method example.
- The moment equations are -250x for 0 to 4 ft, -75x² + 1,050x - 4,000 for 4 to 10 ft, and 250x - 3,500 for 10 to 14 ft.
- The equations meet at -1,000 lb·ft at x = 4 ft and x = 10 ft, while the beam-end moments are zero.
- At x = 7 ft the shear is zero and the parabolic moment is -325 lb·ft, identifying the interior moment extremum.
- For a straight-line shear segment, the zero-crossing distance can be found by dividing the initial shear magnitude, 450 lb, by the slope magnitude, 150 lb/ft, giving 3 ft from x = 4 ft.
Transcript excerpt
0:01 Okay. Lecture 23. Today we're going to talk about shear moment equations. The name of the Father, Son, Holy Spirit, and Amen. Direct the Lord we beseech to you our actions by Holy inspirations and carry them home by great assistance that every prayer and work of ours may begin into your come to completion through Christ our Lord. Amen. All right. So how is everybody doing? All good? Um so today we're going to continue the lecture on shear moment. Um but today we're going to talk about shear moment equations. Okay. By the end of the class I will give you the test back. Okay. Um you already saw the the grade and then
0:50 we can discuss if you have any questions by the end of the class you can you stick around and ask me questions about the the exam number two. Okay. But let's first let's dive on the lecture today which is very important one. Okay. All right. Okay. All ready? So last week, Thursday, we decide we start discussing about internal force
1:37 and internal moments. Okay. And I introduce to you the set of internal force, internal moment that we have in any structure. Okay. Which are the normal force, the normal force being the tension compression force that we had we had been working for a few time already. The shear force that perpendicular to the body, okay? Normal force parallel to the body, shear force perpendicular to the body, and that is also um a moment, internal moment trying to rotate that body. Okay? We just got about sign convention uh as well because we are going to solve which actually we solve it using kind of the method of sections. In the method of
2:25 sections, we cut the sections and we uh
This is the start of the transcript. Save this video free for the whole transcript, searchable and time-coded.
In this course
Related notes
Summary, takeaways, and chapters were generated by AI from the video's transcript and may contain errors. The video belongs to its creator, Bruno Guidio, PhD.