CE 312 Lecture 34: Influence Lines III, Dealing with Fixed Supports & Trusses (2026.11.06)
 Watch on YouTube →
Overview
Gregory Michaelson extends influence-line construction with the Müller-Breslau principle to fixed supports, emphasizing that only the response of interest is released: a fixed support’s other restraints remain active. He then shows how to build truss-member influence lines by moving a unit load between joints, solving the truss, and recording member forces, with patterns that help identify worst-case moving-load effects.
Key takeaways
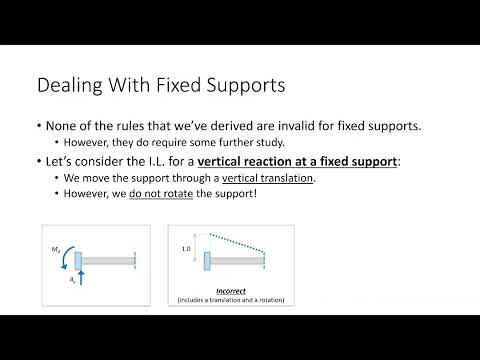
- When constructing an influence line at a fixed support, release only the target response: for vertical reaction Ay, translate the support without rotating it; for moment reaction MA, allow rotation while retaining translation restraints.
- A 20-foot cantilever’s vertical-reaction influence line is constant at 1, while its counterclockwise-positive fixed-end moment influence line reaches 20 at the free end.
- For shear at B on a cantilever fixed at A, the influence line is zero on the fixed-end side and jumps by one across B; a load produces shear at that section only after passing it.
- For moment at B, an internal hinge releases the moment; in the illustrated 10-foot segment, a unit slope change gives a free-end influence-line value of -10.
- Truss-member influence lines are built by placing a unit load at relevant joints, solving the truss, and tabulating each member’s axial force; load locations should follow the actual roadway or traffic path.
- In the illustrated typical truss, bottom-chord member influence lines are positive, top-chord lines are negative, diagonal lines change sign according to orientation, and vertical member BF responds only when its joint is loaded.
Chapters
- Gregory Michaelson says exam grading is nearly complete, with algebra in Problem 3 taking the most time.
- A common error on Problem 1 was counting an internal hinge as requiring an additional moment function; Michaelson says it does not.
- The lecture addresses influence lines for fixed supports and trusses before applying them to structural analysis and moving-load problems.
- The Müller-Breslau procedure still applies: release the structure’s ability to resist the target response, then impose a unit displacement or rotation.
- At a fixed support, release only the response being studied; retain the other restraints, such as rotation when studying vertical reaction.
- A fixed support prevents both translation and rotation, unlike a simple support, which permits rotation.
- For vertical reaction Ay, a unit vertical load anywhere on the cantilever produces Ay = 1, so its influence line is constant at 1.
- To construct Ay with Müller-Breslau, translate the fixed end upward by one unit without allowing it to rotate.
- For moment reaction MA, release the moment restraint while retaining the pin-like translation restraints; counterclockwise is defined as positive.
- On the 20-foot cantilever, the MA influence-line value reaches 20 at the free end and 10 halfway along.
- Releasing shear at B creates a shear release, but the fixed support at A remains unchanged, so displacement and rotation there are both zero.
- The influence line for shear at B stays zero on the side of B toward the fixed end, then jumps by one across B.
- A statics check gives the same result: a unit load on the cantilever segment before B produces zero shear at B, while a load beyond B produces unit shear.
- Michaelson compares the unloaded segment to a diving board that moves with the loaded portion without experiencing the section force until the load passes it.
- Releasing moment at B is represented by inserting an internal hinge; the influence line is zero on one side and slopes downward on the other.
- For the illustrated geometry, the free-end value is -10 because the unit rotation creates a total slope change of one over the 10-foot segment.
- A cantilever with three rollers and intervening hinges demonstrates that each segment remains straight, hinges change segment direction, and influence-line values are zero at supports.
- For a vertical reaction, the support is translated one unit without rotation; segment heights can then be found by linear interpolation.
- For a truss member such as AB or DJ, the target response is the axial force in that member.
- Michaelson recommends moving a unit load to each relevant joint, solving the truss with the method of joints or sections, and recording member forces.
- Place the moving load where the real load path lies: at bottom joints when the roadway is below the truss, or at top joints when traffic or a train runs above it.
- In the symmetric example, loads at end joints A and E produce zero member responses; symmetry lets the analysis for joint B provide the corresponding results for D.
- For the example, truss analyses are performed with the unit load at joints B and C, while support-reaction values can be read from their existing influence lines.
- A table organizes each member’s force for load positions A through E, converting the joint-by-joint analyses into plotted influence-line ordinates.
- For member AB, the example records zero at x = 0 and one at x = 20 before plotting and interpolating between joints.
- In the typical truss example, bottom-chord members AB and CD have positive influence-line values, while top-chord member FG has negative values.
- Diagonal-member influence lines change sign across the truss; reversing a diagonal’s orientation reverses its sign pattern.
- Vertical member BF carries a value of one when the unit load is at its joint and is a zero-force member for the other load positions.
- Influence-line patterns identify where moving loads create critical member forces and support both direct structural analysis and worst-case response calculations.
Transcript excerpt
0:03 Okay. >> Um, just a heads up on grading the exam. Um, I'm I'm largely finished with it, but the one problem that is taking me a little bit longer than I thought to was problem three. And not because of anybody doing anything wrong or anything, but it's just because that's the problem that has all the algebra that I have to get through. So, it just took me a little bit longer. Class as a whole was doing uh very well. Um there's a few like little things that have popped up here and there like for example on the uh moment diagram on problem two. So the answer on that right end it was supposed to sort of curve down and do that and a lot of folks are curving it the other way even though like the values are are right. Um I would say actually the hardest problem on the exam was there was a question on
0:52 problem one that a lot of people missed. There was uh that was the one where it was how many moment functions are necessary to fully define the moment diagram and there was one with an internal hinge. An internal hinge does not necessitate an additional moment function yet a lot of people said it did you know. So um I I actually think that like that twopoint problem was probably one of the the most missed ones but it's only a two-point problem so you know not that big of a deal. Um, so it's just taking me a little while to get through the algebra, but by and large everybody, you know, it's it's going very well. Um, so today, um, what we're going to do is is I would say my, um, my last sort of
This is the start of the transcript. Save this video free for the whole transcript, searchable and time-coded.
In this course
Related notes
Summary, takeaways, and chapters were generated by AI from the video's transcript and may contain errors. The video belongs to its creator, Gregory Michaelson.